Thought i would update my blog to show how i'm getting along with the idents. With it being so close to the end of the semester, my idents are really shaping up and should be ready to be handed in on time! Well they have to be i spose :-)
-
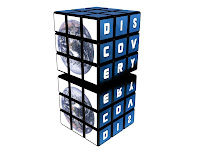
I'll start off with the Cube itself. This was actually done very early on in the project, i just didn't do a blog about it. Thought i better had as it's a big change in the design.
-
I had problems with my original cube using planes and chamfer boxes, and being able to rotate them like a proper rubiks cube. Although my cube was good as it was, I had to think of another way around it. I decided to remove the planes and place the images I was using directly onto the chamfer boxes surface vertex. This simplified the cube and removed the annoying planes I was using. I dont know why I didnt think of this before :-/ Applying the materials onto the cube sides took a lot of time as each one had to be rotated accordingly. Also I had to make use of the multi-material function, something I didn't know existed. The material viewer seems to be limited to only 24 materials, and I wasn't sure how I could add more. The multi layers got around this problem. I'll explain more on this in my write up.
Although there is not much difference in appearance, the new method of making the cube sorted out all my problems with rotating it.
<-- Original Cube - Re-Design Cube -->