 -
-
Monday, 17 March 2008

The Army Research Board
A Modern, Professional Army
-
The British Army is a forward looking organisation founded on the bedrock of strong leadership. It depends on obtaining, sustaining and retaining soldiers of the highest quality, ensuring they are equipped to the highest possible standard
-
The British army is a huge organisation with many different jobs and opportunities for those wishing to get involved and join up. There are many different views on the army, some positive, while some negative. For this project it is looking at army recruitment therefore a positive message is going to be portrayed. The following is research carried out on different army advertising campaigns and sources of this advertising material.
-
The Army on TV
-
More recently the army has made a lot more effort in advertising itself to an audience, and the quality of this advertising is of a high standard. The adverts found on the television normally consist of acting out a real life situation you could find yourself in if you where to join.
-
 -
-
This advertising normally asks you to check out the internet to find out what happens next in the video, and this is a great way of getting people to look at the army website.
-
The Army on the Internet
-
http://www.armyjobs.mod.uk/
-
The army jobs website has all the information you would need about joining the army and what type of work the army would demand. The website goes into detail on all the different aspects of army life and offers stacks of information that someone considering joining up would need to know.
- -
-
The brief for the project states that it is aimed at 16 year olds who are carrying on education and might want to consider the army as an alternative, or an option to take after. Here is what the website has to say about education in the army.
-
__________________________________________________________________
-
Education
-
The British Army - one of the most respected military organisations in the world. And who are the brains behind the whole operation? The truth is, it's every soldier and officer who makes up its ranks. We believe your education is fundamental to making the Army the best it can be, so we take your learning and development very seriously. From university degrees, to trade skills, to the financial incentives which help you get there, you'll find Army education integral to your career, and the doorway to achieving things in life you never thought possible.
-
Are You 15-18 Years Old?
-
As you near the end of compulsory school, you'll be thinking about your GCSEs/SCEs, and also what to do after them. If you're considering a career in the Army but also want to further your education at college or university, joining one of the Army's Further Education Colleges might be just what you are after.
The Army has three colleges: the Army Foundation College in Harrogate, the Army Training Regiment at Bassingbourn and Welbeck - The Defence Sixth Form College. Apart from Welbeck, you'll be paid from the start and whichever college you attend, you'll gain the confidence needed to lead others in one of the most challenging careers there is.
-
At University or Going Soon?
-
If you're heading off to university soon or are already there, you'll be eligible to apply for financial sponsorship through the Army. And because university is such a social place, we also run the University Officers Training Corps (UOTC) - an ideal way to get stuck into some real adventure with friends while getting paid for the privilege.
-
-
The British Army is a forward looking organisation founded on the bedrock of strong leadership. It depends on obtaining, sustaining and retaining soldiers of the highest quality, ensuring they are equipped to the highest possible standard
-
The British army is a huge organisation with many different jobs and opportunities for those wishing to get involved and join up. There are many different views on the army, some positive, while some negative. For this project it is looking at army recruitment therefore a positive message is going to be portrayed. The following is research carried out on different army advertising campaigns and sources of this advertising material.
-
The Army on TV
-
More recently the army has made a lot more effort in advertising itself to an audience, and the quality of this advertising is of a high standard. The adverts found on the television normally consist of acting out a real life situation you could find yourself in if you where to join.
-
 -
-This advertising normally asks you to check out the internet to find out what happens next in the video, and this is a great way of getting people to look at the army website.
-
The Army on the Internet
-
http://www.armyjobs.mod.uk/
-
The army jobs website has all the information you would need about joining the army and what type of work the army would demand. The website goes into detail on all the different aspects of army life and offers stacks of information that someone considering joining up would need to know.
-
 -
-The brief for the project states that it is aimed at 16 year olds who are carrying on education and might want to consider the army as an alternative, or an option to take after. Here is what the website has to say about education in the army.
-
__________________________________________________________________
-
Education
-
The British Army - one of the most respected military organisations in the world. And who are the brains behind the whole operation? The truth is, it's every soldier and officer who makes up its ranks. We believe your education is fundamental to making the Army the best it can be, so we take your learning and development very seriously. From university degrees, to trade skills, to the financial incentives which help you get there, you'll find Army education integral to your career, and the doorway to achieving things in life you never thought possible.
-
Are You 15-18 Years Old?
-
As you near the end of compulsory school, you'll be thinking about your GCSEs/SCEs, and also what to do after them. If you're considering a career in the Army but also want to further your education at college or university, joining one of the Army's Further Education Colleges might be just what you are after.
The Army has three colleges: the Army Foundation College in Harrogate, the Army Training Regiment at Bassingbourn and Welbeck - The Defence Sixth Form College. Apart from Welbeck, you'll be paid from the start and whichever college you attend, you'll gain the confidence needed to lead others in one of the most challenging careers there is.
-
At University or Going Soon?
-
If you're heading off to university soon or are already there, you'll be eligible to apply for financial sponsorship through the Army. And because university is such a social place, we also run the University Officers Training Corps (UOTC) - an ideal way to get stuck into some real adventure with friends while getting paid for the privilege.
-
Wednesday, 12 March 2008
Modelling my Mug (step by step)
MODELLING MY FACE PART 2 - you NOSE it!
-
The hardest thing I have encountered so far with modelling my mug is the nose and the mouth. This has taken literally hours of fiddling and tweaking, changing lines, moving vertexes, and with all this nearly falling off my chair laughing at the way it turns out.
-
I've decided that in order to make progress with my face and get all my other coursework done as well i'm going to have to settle with something, so what i have done i wouldn't say i'm 100% happy with, but it's good enough to continue to the next stage without starting again completely from scratch (something i have seriously contemplated)
-
Stay tuned for my eyes and ears and the rest of the head - bleh!
-
 -
-
MODELLING MY FACE PART 2 - symmetry
-
The next stages of the face modelling is in 3D studio max. The image of the topographical lines were imported into max so I could create lines over the image to build up a mesh of my face. Once this was done (and with a LOT of tweaking), the face can be made symmetrical allowing the next stage of the face to be completed.
-
This is what turned out.
- -
-
Moving the vertexes sideways was tricky to begin with but it comes together in the end.


MODELLING MY FACE PART 1 - topology
-
I thought it might be a good idea to upload some images of my attempts at modelling my face in 3D max.
-
The first stage was getting a suitable image of my face front and side on and making sure that key areas lined up okay (eyes, nose and mouth) - This was VERY annoying, but I got there in the end (still not exactly lined up like that guy in the tutorial, what a complete symmetrical freak). to make my face more symmetrical I mirrored one side of it.
-
Here are images of my face lined up with the topographical lines drawn on. (excuse the dodgey hair)
-


-
-
The hardest thing I have encountered so far with modelling my mug is the nose and the mouth. This has taken literally hours of fiddling and tweaking, changing lines, moving vertexes, and with all this nearly falling off my chair laughing at the way it turns out.
-
I've decided that in order to make progress with my face and get all my other coursework done as well i'm going to have to settle with something, so what i have done i wouldn't say i'm 100% happy with, but it's good enough to continue to the next stage without starting again completely from scratch (something i have seriously contemplated)
-
Stay tuned for my eyes and ears and the rest of the head - bleh!
-
 -
-MODELLING MY FACE PART 2 - symmetry
-
The next stages of the face modelling is in 3D studio max. The image of the topographical lines were imported into max so I could create lines over the image to build up a mesh of my face. Once this was done (and with a LOT of tweaking), the face can be made symmetrical allowing the next stage of the face to be completed.
-
This is what turned out.
-
 -
-Moving the vertexes sideways was tricky to begin with but it comes together in the end.


MODELLING MY FACE PART 1 - topology
-
I thought it might be a good idea to upload some images of my attempts at modelling my face in 3D max.
-
The first stage was getting a suitable image of my face front and side on and making sure that key areas lined up okay (eyes, nose and mouth) - This was VERY annoying, but I got there in the end (still not exactly lined up like that guy in the tutorial, what a complete symmetrical freak). to make my face more symmetrical I mirrored one side of it.
-
Here are images of my face lined up with the topographical lines drawn on. (excuse the dodgey hair)
-


-
Friday, 7 March 2008
Army Recruitment
First blog of the new semester (sorry it's been a while).
I've decided to join the army! The design brief I have chosen is the Army Recruitment Campaign. After contemplating all the different design briefs, I came to the conclusion that the army would be an interesting subject to cover.
-
Why? Because it's teaching the young generation how they can improve their life skills in the army... and because you get to blow stuff up!
-
It's important to come up with an original idea, and also important to expand on my 3D max skills that I developed in the first semester. I'm going to pursue using reactor because it's such a fantastic physics engine it would seem silly not to make use of its destructive capabilities. I'll be implementing other elements also (these undecided, perhaps particles for explosions etc). Watch this space for research and mood boards.
-
-
On other notes, the 3D model of my face is coming along horribly. I'll get up some more on this when I can.
-
Dismissed!
I've decided to join the army! The design brief I have chosen is the Army Recruitment Campaign. After contemplating all the different design briefs, I came to the conclusion that the army would be an interesting subject to cover.
-
Why? Because it's teaching the young generation how they can improve their life skills in the army... and because you get to blow stuff up!
-
It's important to come up with an original idea, and also important to expand on my 3D max skills that I developed in the first semester. I'm going to pursue using reactor because it's such a fantastic physics engine it would seem silly not to make use of its destructive capabilities. I'll be implementing other elements also (these undecided, perhaps particles for explosions etc). Watch this space for research and mood boards.
-
-
On other notes, the 3D model of my face is coming along horribly. I'll get up some more on this when I can.
-
Dismissed!
Wednesday, 5 December 2007
Ident Two - Reactor
I've been trying my best to get to grips with reactor. It's tricky stuff, but so far I have been able to get a few things out of it. My idea for the second ident is to use the cube in a different way other than it just turning into place. A crane will knock into the cube causing the parts to fly about in different directions.
-
I've had a play around in reactor with rigid body collections and have managed to come up with the following video. This is just a small test I have done to give the general idea as to what I would like to achieve.
-
I would like to have the ball attatched to the crane so i've been playing around with reactor rope also. This is quite ambitious but i'm hoping everything will join up and work together!
-
This is a test video I have created using reactor rope.
-
-
I've had a play around in reactor with rigid body collections and have managed to come up with the following video. This is just a small test I have done to give the general idea as to what I would like to achieve.
-
I would like to have the ball attatched to the crane so i've been playing around with reactor rope also. This is quite ambitious but i'm hoping everything will join up and work together!
-
This is a test video I have created using reactor rope.
-
The Cube Faces (detail)
It may seem like an easy thing, applying a few images onto cube faces. But I found with most things, it isn't as easy it might appear to be.
-
I obtained a selection of images i believed suited the channel, and themes from my mood board design. The images ranges from underwater, moantains to construction plans etc.
-
The images had to be split up into 6 seperate images so each part could be applied to the surfaces of the cube. Easy peasy. I split up the images into 6 sections using Photoshop, imported them into 3D max, applied them onto the cube face, hit render and VOILA! it's wrong! Take a look at the rendered picture.
 -
-
The images are all wonky and do not align properly. Just look at the pencil! I realised that i hadnt compensated for the black dividing grid lines on the cube. I had to put all my images back into Photoshop and I created a template with black lines already on. This was a long shot. I put the image on this and using layers, I copied each individual square and saved it as a new file.
Then copied each section the square and made lots of little these.. Some of the image was lost, but it's ok, honest :) You don't notice anyway.


-
I obtained a selection of images i believed suited the channel, and themes from my mood board design. The images ranges from underwater, moantains to construction plans etc.
-
The images had to be split up into 6 seperate images so each part could be applied to the surfaces of the cube. Easy peasy. I split up the images into 6 sections using Photoshop, imported them into 3D max, applied them onto the cube face, hit render and VOILA! it's wrong! Take a look at the rendered picture.
 -
-The images are all wonky and do not align properly. Just look at the pencil! I realised that i hadnt compensated for the black dividing grid lines on the cube. I had to put all my images back into Photoshop and I created a template with black lines already on. This was a long shot. I put the image on this and using layers, I copied each individual square and saved it as a new file.
<-- So I went from this...Put it onto this -->


Then copied each section the square and made lots of little these.. Some of the image was lost, but it's ok, honest :) You don't notice anyway.


The final result..


Cube Re-Design
Thought i would update my blog to show how i'm getting along with the idents. With it being so close to the end of the semester, my idents are really shaping up and should be ready to be handed in on time! Well they have to be i spose :-)
-
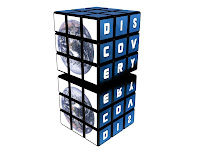
I'll start off with the Cube itself. This was actually done very early on in the project, i just didn't do a blog about it. Thought i better had as it's a big change in the design.
-
I had problems with my original cube using planes and chamfer boxes, and being able to rotate them like a proper rubiks cube. Although my cube was good as it was, I had to think of another way around it. I decided to remove the planes and place the images I was using directly onto the chamfer boxes surface vertex. This simplified the cube and removed the annoying planes I was using. I dont know why I didnt think of this before :-/
 Applying the materials onto the cube sides took a lot of time as each one had to be rotated accordingly. Also I had to make use of the multi-material function, something I didn't know existed. The material viewer seems to be limited to only 24 materials, and I wasn't sure how I could add more. The multi layers got around this problem. I'll explain more on this in my write up.
Although there is not much difference in appearance, the new method of making the cube sorted out all my problems with rotating it.

-
I'll start off with the Cube itself. This was actually done very early on in the project, i just didn't do a blog about it. Thought i better had as it's a big change in the design.
-
I had problems with my original cube using planes and chamfer boxes, and being able to rotate them like a proper rubiks cube. Although my cube was good as it was, I had to think of another way around it. I decided to remove the planes and place the images I was using directly onto the chamfer boxes surface vertex. This simplified the cube and removed the annoying planes I was using. I dont know why I didnt think of this before :-/
 Applying the materials onto the cube sides took a lot of time as each one had to be rotated accordingly. Also I had to make use of the multi-material function, something I didn't know existed. The material viewer seems to be limited to only 24 materials, and I wasn't sure how I could add more. The multi layers got around this problem. I'll explain more on this in my write up.
Although there is not much difference in appearance, the new method of making the cube sorted out all my problems with rotating it.
<-- Original Cube - Re-Design Cube -->


Subscribe to:
Posts (Atom)
