Monday 19 November 2007

Rotate Woes and Pivoting (Reflections Too!)

Spent most of the morning trying to solve my rotating the cube problem. Max didn't like me animating each grouped cube when I selected them all. Instead of animating the entire selection it would rotate each piece individually. You can see what I mean from the video..


Animating all parts of the cube (annoying!!!):

-

So if I grouped all of the cubes I wanted to move, this would solve the problem! Brilliant? er NO! Because certain parts of the cube are grouped, this restricted me to what parts I could actually rotate. So I had the idea of grouping certain parts, rotating them, then un-grouping them to allow me to group other sections. The idea was good but Max decided he didn't like it and decided to remove the animation I had done for the group I had just un-grouped!

-

Confusing?........................ yep!

-

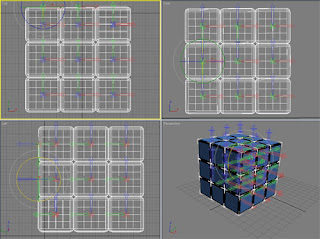
So the next steps where to understand how things rotate and this lead me on to Pivot Points. Each individual square has its own Pivot Point, which is the source of it's own rotation. Look at the image and it shows the Pivot Points for each individual square.

-

-

The next step was to move all the Pivot Points for the squares to the middle. Under Hierarchy you can select the pivots, so I clicked the effect pivot only tab, selected them all and moved them to the middle. Went back to animate the cube and it worked. Also a nice helpful feature is the Angle Snap Toggle which snaps all the cubes together so none will be out of alignment.

-

After this I am going to play around with reflecting the cube onto the surface, so here is a small preview of how it rotates properly, and a nice reflection underneath.

-

Rotate and Reflection:

Thursday 15 November 2007

Re-Design Cube and Animation

Before I begin I got bored and looked up the Rubix cube, and realised i've been making the common mistake of calling it a Rubix cube, when it's actually a Rubiks cube!! (it was originally called the "Magic Cube", how very interesting-ish).

Anyway, i've spent all afternoon working with the cube (can u believe putting a bunch of squares together can be so time consuming?!). I moved away from the blocky simple squares done in my original play around and I found that using the
chamfer box gives a much nicer shape with nice rounded edges.

For each side of the cube I'm using planes, and I've removed all the unnecessary ones to make it true to a real 3x3 rubiks cube. i.e. I only have 54 faces on the cube.

CONSTRUCTING THE CUBE:

Also I have made a quick animation showing how the cube moves. Haven't figured out an effective way of moving all the rows and blocks yet. Max doesnt like it when I rotate and animate, hard to explain and slightly confused at this but hopefully I will figure it out :-/

ANIMATING THE CUBE:


Early Design Ideas

I've had a quick play around in 3D Max and have rendered a few images to show the sort of approach i'm making with the idents.

*NOTE* This are some very early work and will change, but thought i'd upload it to show the general idea.


Storyboarding

Sorry for delay in posting blogs.

These are some early storyboards I have sketched for an idea I've had for the idents. The theme is a rubix cube, which I came up with randomly (don't know how I got the idea, it just popped into my head). Luckily the word DISCOVERY fits along a complete side of the cube. Too bad CHANNEL doesn't.

The rubix cube fits nicely with the discovery channel. I will rotate my three idents on this idea and have a diffrerent approach for each one. Hoping I can turn each one into something thats good (oops sorry about all the bad puns! will I lose marks?)


STORYBOARDS:


*BLOG EDIT* Have added the other storyboard ideas I have had for my other idents. One is a crane bashing the cube into tiny pieces, and the other is a space scene with the blocks floating away with gravity.

IDENT TWO:

IDENT THREE:-